티스토리 뷰
Vue 컴포넌트?
작고
독립적이며
재사용할 수 있는
-> 뷰 세계에서 가장 기본적인 구성 요소
컴포넌트 시스템
= 컴포넌트의 조합
컴포넌트 여러개가 모여서 컴포넌트 시스템을 이루어 대규모 애플리케이션 구축이 가능하다.
각각의 컴포넌트들은 트리구조로 이루어져 있으며, 서로 상호작용을 하여 애플리케이션 서비스를 이룬다.

컴포넌트 작성과 사용
<script type="text/javascript">
Vue.component('hello-component', {
    template : '<div>hello world!!!</div>'
})
</script>
파라미터
-
태그명: 컴포넌트를 사용할 태그
-
태그명은 대소문자를 구별하지 않으므로, 가능한 케밥 표기법을 따르는 것이 좋다!
-
-
옵션: 기타 정보(template, props 등)
템플릿 작성 방식
1. 인라인 템플릿
위처럼, template 옵션에 템플릿 문자열을 사용하는 방식을 인라인 템플릿(inline template)이라고 한다.
그리 권장되는 방법은 아니다.
2. template 태그 사용
<template id="helloTemplate">
    <div>hello world!!!</div>
</template>

<script type="text/javascript">
  Vue.component('hello-component', {
    template : '#helloTemplate'
  })
</script>
3. <script type="text/x-template"> 태그 사용
<script type="text/x-template" id="helloTemplate">
    <div>hello world!!!</div>
</script>

<script type="text/javascript">
  Vue.component('hello-component', {
    template : '#helloTemplate'
  })
</script>
사용하기
이렇게 작성된 컴포넌트를 사용할 때는 등록한 태그명을 사용한다.
<hello-component></hello-component>
전체 코드를 보면 아래와 같다.
<!DOCTYPE html>
<html>
<head>...</head>

<!-- 템플릿 등록 -->
<template id="helloTemplate">
    <div>hello world!!!</div>
</template>

<!-- 컴포넌트 작성 -->
<script type="text/javascript">
  Vue.component('hello-component', {
    template : '#helloTemplate'
  })
</script>

<!-- 컴포넌트 사용 -->
<body>
  <div id="app">
    <hello-component></hello-component>
    <hello-component></hello-component>
    <hello-component></hello-component>
  </div>
</body>

<script type="text/javascript">
var v = new Vue({
  el : '#app'
})
</script>

</html>
작성 시 주의사항 1 - 자식 요소가 정해져 있는 HTML 요소
HTML 요소들은 자식 요소로 포함할 수 있는 요소들이 정해져있는 경우가 있다.
아래의 select, option 태그가 그러하다.
<select name='fruits'>
  <option value='' selected>-- 선택 --</option>
  <option value='apple'>사과</option>
  <option value='banana'>바나나</option>
  <option value='lemon'>레몬</option>
</select>
브라우저는 구문분석을 수행하다가, 자식 요소로 정해져있는 태그가 아닌, 다른 것이 왔을 때에 오류를 내뿜는다.
아래 코드를 살펴보자.
<script type="text/javascript">
  Vue.component('option-component', {
    template : '<option>hello</option>'
  })
</script>

<body>
    <div id="app">
        <select>
            <option-component></option-component>
            <option-component></option-component>
        </select>
    </div>
</body>

<script type="text/javascript">
Vue.config.devtools = true;
var v = new Vue({
  el : '#app'
})
</script>
브라우저는 태그 구문 분석하는 작업을 먼저 수행한 후, Vue 컴포넌트를 렌더링한다.
option-component를 select 태그 안에서 사용할수 있다고 브라우저에 등록되어있지 않으므로, Vue 컴포넌트 렌더링 단계까지 가기 전에 구문분석 오류를 내뱉는다.
이 문제를 해결하기 위해서 is 특성(Attribute)을 이용할 수 있다.
<select>
        <option is="option-component"></option>
        <option is="option-component"></option>
</select>
Single File Component로 작성된 경우나 <script type="text/x-template"> 태그 안에서 사용된 경우에는 굳이 is 특성을 사용하지 않아도 된다.
작성 시 주의사항 2 - 템플릿 요소 안에는 루트 요소가 하나
<!-- 틀린 예 -->
<template id="helloTemplate">
    <div>hello world!!!</div>
    <div>hello world!!!</div>
</template>

<!-- 옳은 예 -->
<template id="helloTemplate">
	<div>
      <div>hello world!!!</div>
      <div>hello world!!!</div>
    </div>
</template>
컴포넌트 옵션 - data 옵션
data 옵션은 컴포넌트 내부의 로컬 상태 정보를 저장하기 위한 용도로, 아래와 같이 작성한다.
<template id='timeTemplate'>
    <div>
        <span>{{nowTS}}</span>
        <button v-on:click="timeClick">현재 시간</button>
    </div>
</template>

<script>
Vue.component('time-component', {
    template : '#timeTemplate',
    data : function() {
        return { nowTS : 0 };
    },
    methods : {
        timeClick : function(e) {
            this.nowTS = (new Date()).getTime();
        }
    }
})
</script>
위 코드처럼 정상적으로 렌더링되려면 data 옵션에는 객체를 리턴하는 함수가 주어져야 한다.
이렇게 함수를 지정하는 이유는, 동일한 컴포넌트가 여러 번 사용되더라도 동일한 객체를 가리키는 것이 아니라, 새로운 객체가 리턴되도록 하여서 서로 다른 객체를 참조하도록 하기 위함이다.
같은 맥락에서, 아래 코드처럼 data 옵션을 지정하면 같은 객체를 참조하므로, 아래와 같이 작성해서는 안된다.
var data = { nowTS : 0 };
Vue.component('time-component', {
    template : '#timeTemplate',
    data : function() {
        return data;
    }
})
컴포넌트 옵션 - props와 event
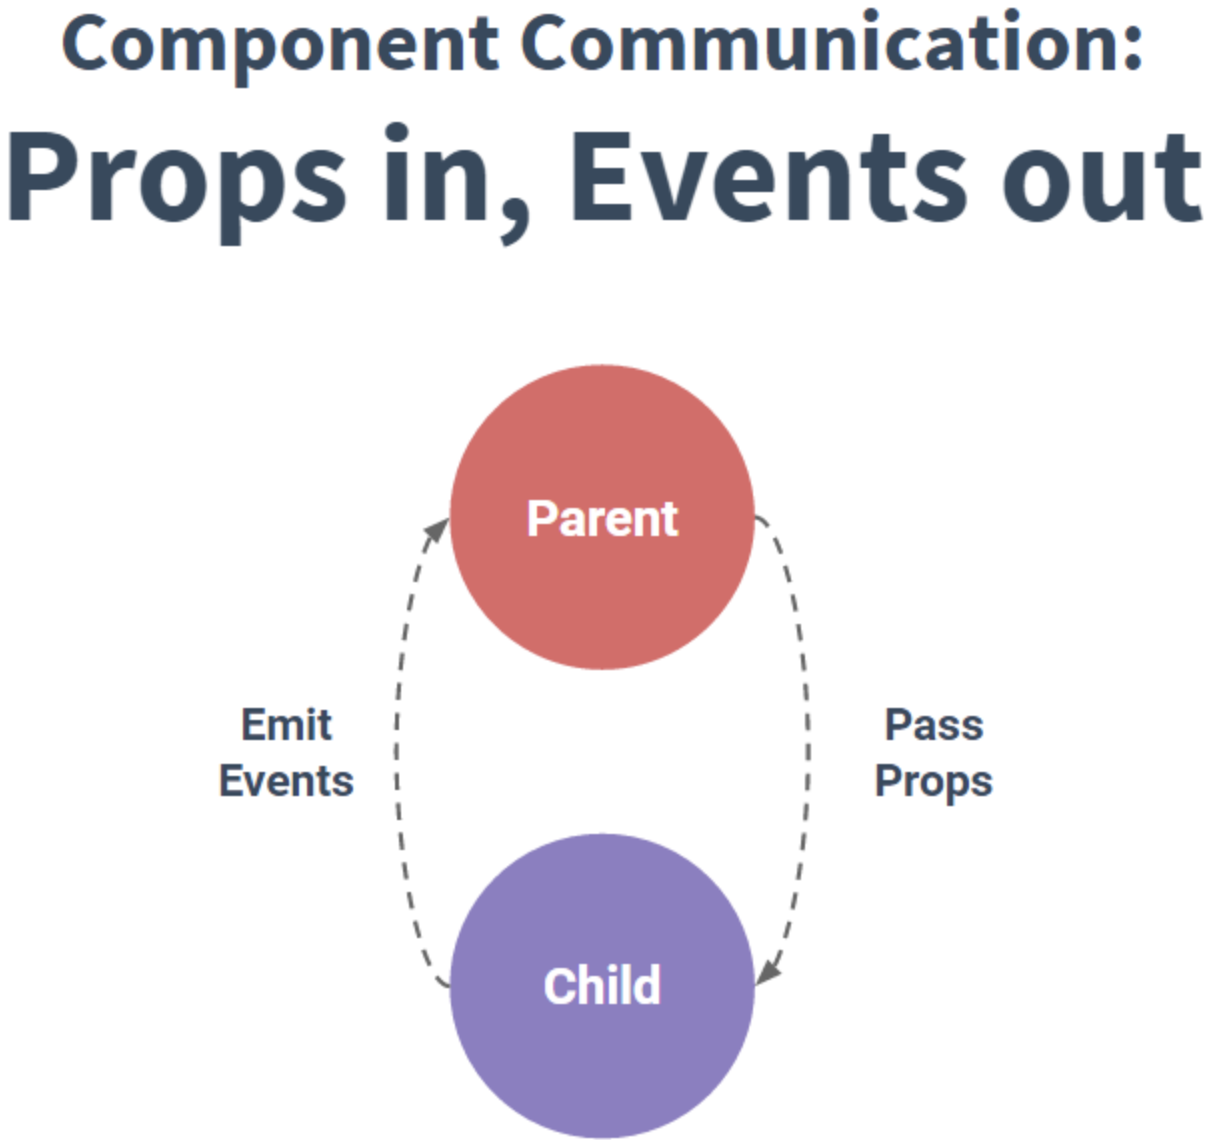
부모 컴포넌트는 Props를 통해 자식 컴포넌트에 정보를 전달하고,
자식 컴포넌트는 event를 발생시켜서 상태를 전달한다.
부모에서 자식으로 단방향으로만 props를 이용한 정보 전달이 가능하다.
자식 컴포넌트에서 props를 바꿀 수 없으며, 부모로부터 전달 받는 것을 사용하는 것만 가능하다.
자식 컴포넌트에서 props 정의
props 명을 배열로 나열하거나, 엄격한 유효성 검증이 필요한 경우에는 아래처럼 객체 형태로 정의할 수 있다.
<template id="listTemplate">
    <li>{{message}}</li>
</template>

<script>
Vue.component('list-component', {
    template : '#listTemplate',
    props : [ 'message' ]    // props 명을 배열로 나열
})
</script>
<template id="listTemplate">
    <li>{{message}}</li>
</template>

<script type="text/javascript">
Vue.component('list-component', {
    template : '#listTemplate',
    props : {
        message : {
        	type: String,
        	default: '안녕하세요'
        },
        count : {
        	type: Number,
        	required: true
        },
        countries: {
        	type: Array,
        	default: () => ['Korea']
        }
    } // props 명을 객체 형태로 정의
})
</script>
※ 전달받을 값이 배열이나 객체인 props에 default 값을 부여할 때에는 반드시 함수를 사용해야 한다.
부모 -> 자식 컴포넌트에 props 전달
props를 통해 정보를 전달하는 방법은 HTML 요소의 attribute에 값을 부여하는 방식과 비슷하다.
전달하는 방법은 2가지가 있다.
- 값을 바로 부여하기 (String)
- 변수나 객체를 바인딩하여 부여하기
값을 바로 부여하는 방법은 해당 props의 type이 String인 경우에만 동작한다.
그 외에는 v-bind를 통해 바인딩함으로써 전달한다.
<ul>
  <list-component message="Hello"/> <!-- 값을 그대로 부여 -->
    <list-component v-bind:count="100"/> <!-- Number type의 값을 바인딩하여 전달 -->
  <list-component :count="21"/> <!-- v-bind 축약 형태 -->
  <list-component :message="message"/> <!-- 변수를 바인딩하여 전달 -->
</ul>
※ props를 표기할 때 주의할 점은, 컴포넌트 작성 시 props를 카멜 표기법으로 사용했다면, 이를 케밥 표기법으로 바꾸어 사용해야 한다.
태그 작성 시 attribute는 대소문자를 구분하지 않기 때문이다.
Event를 이용한 정보 전달
자식 컴포넌트에서는 이벤트를 발신(emit)하고, 부모 컴포넌트에서는 v-on 디렉티브를 이용해 이벤트를 수신한다.
<자식 컴포넌트>
<template id="childTemplate">
    <div>
    	<!-- HTML 요소의 이벤트 리스너 등록 -->
        <button v-on:click="clickEvent" :data-lang="buttonInfo.value">
	        {{ buttonInfo.text }}
        </button>
    </div>
</template>

<script>
Vue.component('child-component', {
    template : '#childTemplate',
    props : [ 'buttonInfo' ],
    methods : {
        clickEvent : function(e) {
            /**
            * 상위 컴포넌트에 'timeclick' 이벤트 발신
            * 이벤트를 발신할 때 필요한 정보들을 인자로 전달
            */
            this.$emit('timeclick', e.target.innerText, e.target.dataset.lang);
        }
    }
})
</script>
<부모 컴포넌트>
<template id="parent-template">
    <div>
        <child-component v-for="s in buttons" :button-info="s"
			             @timeclick="timeclickEvent"/>
                         <!-- timeclick 이벤트 수신 및 리스너 등록 -->
        <hr />
        <div>{{ msg }}</div>
    </div>
</template>

<script>
Vue.component('parent-component', {
    template : '#parent-template',
    data : function() {
        return {
	        msg: "",
            buttons : [
                { text : "Hello", value : "영어" },
                { text : "씬짜오", value : "베트남어" },
                { text : "니하오", value : "중국어" }
            ]
        };
    },
    methods : {
    	/**
        * timeclick 이벤트 리스너
        * 자식 컴포넌트에서 이벤트를 발신할 때 넘겨준 2개의 인자를 전달받음
        */
        timeclickEvent : function(k, v) {
            this.msg = k + ", " +v;
        }
    }
})
</script>
Event Bus 객체를 이용한 통신
비어있는 Vue 인스턴스를 만들어, global한 이벤트버스로써 데이터 전달 역할을 한다.

var eventBus = new Vue();
<!-- 이벤트 버스 객체 -->
<script>
var eventBus = new Vue();
</script>

<!-- 첫번째 자식 컴포넌트 -->
<template id="chidl1Template">
    <div>
        <button v-on:click="clickEvent">child1 button!!</button>
        <div>{{currentTime}}</div>
    </div>
</template>

<script>
Vue.component('child1-component', {
    template : '#chidl1Template',
    data : function() {
        return { currentTime : '' };
    },
    methods : {
        clickEvent : function() {
			var d = new Date();
			var t = d.toLocaleTimeString() + " " + d.getMilliseconds() + "ms";

			// 이벤트 버스를 통해 click1 이벤트 발신
			eventBus.$emit('click1', t);
			this.currentTime = t;
        }
    }
});
</script>

<!-- 두번째 자식 컴포넌트 -->
<template id="chidl2Template">
    <ul>
        <li v-for="t in timelist">{{t}}</li>
    </ul>
</template>
<script type="text/javascript">
Vue.component('child2-component', {
    template : '#chidl2Template',
    data : function() {
        return {
            timelist : []
        };
    },
    created : function() {
        // 이벤트 버스를 통해 click1 이벤트 발신
        eventBus.$on('click1', this.child1Click);
    },
    methods : {
        child1Click : function(time) {
            this.timelist.push(time);
        }
    }
});
</script>

<body>
    <div id="app">
        <child1-component></child1-component>
        <hr />
        <child2-component></child2-component>
    </div>
</body>
- End -
'Programming > Lib, Frameworks' 카테고리의 다른 글
| [Vue] Vue Router - chunk load fail 로 인한 삽질기 (3) | 2021.07.17 |
|---|---|
| Vue.js - 컴포넌트가 뭐길래 2 (0) | 2020.02.06 |
| [Vue.js] 뷰 트랜지션(transition)의 사용 방법과 치명적인 문제점 (2) | 2018.09.22 |